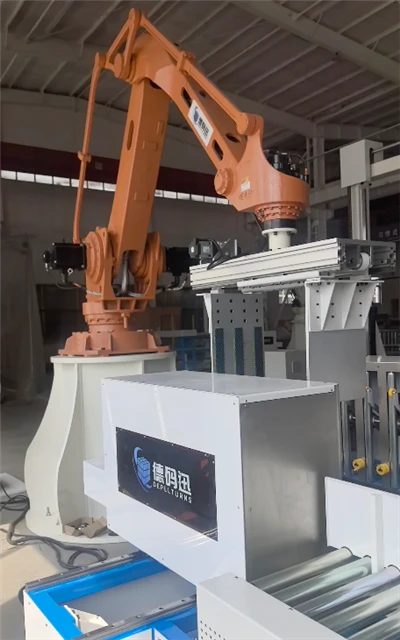
If you are searching for case palletizer troubleshooting, the fault is almost always in one of seven places: the vacuum pickup, the transfer grip, the pallet dispenser, the infeed conveyor, the controls, the stacking pattern, or the air supply. Narrow it to one before changing a setting. This guide takes each fault in the order a technician meets it - symptoms, cause, a safe check, and prevention.
The costliest minutes come after the palletizer stops: upstream converters keep running, cases pile up, and people press Reset. Adjusting setpoints before measuring turns a ten-minute vacuum problem into a two-hour one.
Key Takeaways
- Lock out first. Apply lockout/tagout (LOTO) before reaching into guarding, pneumatics, or the pallet stack.
- Locate by symptom, then confirm with a measurement - never adjust setpoints on a hunch.
- Most dropped cases trace to vacuum, air pressure, or a carton change, not a failed robot.
- Compare readings with the baseline in your own machine's manual, not another machine's setpoints.
- Never bypass a light curtain or interlock. An unmet safety condition is a condition to satisfy, not a fault.
Machine type. This guide covers the case palletizer - the machine that stacks finished cartons onto a pallet. It does not cover the automatic flip-flop stacker at the end of a sheet line. If your problem is a sheet stacker that will not feed or has an uneven flipping cage, see automatic stacker troubleshooting. For context, our case palletizer solutions overview shows where this machine sits in a line.
Disclaimer. Follow LOTO and your site's safe-work procedures. Verify settings against your own machine's manual. This guide is diagnostic orientation, not a substitute for OEM service.
Quick Diagnosis Table - Match the Symptom to the Fault
Use this case palletizer troubleshooting table to get a direction in five minutes.
|
Symptom |
Most likely fault |
First check (safe, 5 min) |
Go to |
|
Cups approach but pick nothing |
Vacuum supply or cup seal |
Compare vacuum at generator and at cup |
Fault 1 |
|
Case slips or drops in transfer |
Grip margin or pad wear |
Note where in the move the case lets go |
Fault 2 |
|
Case drops only on acceleration |
Speed setting or taught position |
Compare speed/accel with commissioned baseline |
Fault 2 |
|
No pallet at the build position |
Dispenser jam or pallet condition |
Inspect outside the guard; check photoeye |
Fault 3 |
|
Dispenser jams every few pallets |
Debris, air or mixed pallets |
Check finger slots and air supply |
Fault 3 |
|
Cases skew or jam at infeed |
Sensor, pitch or guide gap |
Clean sensor; re-check guide rail gap |
Fault 4 |
|
HMI alarm and mid-cycle stop |
PLC/HMI condition or I/O fault |
Transcribe full alarm code before reset |
Fault 5 |
|
Stack leans or collapses after product change |
Recipe or pattern not validated |
Confirm recipe matches the carton |
Fault 6 |
|
Gripper will not release at build position |
Air or release circuit, not pickup |
Listen for a leak; check filter/regulator |
Fault 7 |
Work top to bottom; do not adjust setpoints before you have measured. A symptom matching two rows is normal - the first check tells you which branch to follow.
Fault 1 - Vacuum Suction Failure: Cups Won't Pick Up Corrugated Cases
Corrugated is porous and uneven; a cup that seals on one carton can leak on another.
Symptoms
- Cups descend, the timer runs, and no pickup occurs.
- Pickup is partial: some cups hold while a corner drops.
- Performance changes with supplier, print, or humidity, with no machine change.
Root Cause
Split the cause into supply and seal. A clogged filter, a leaking line, or low compressed air starves the generator. Cup lips wear, harden, or land in a flute valley, tape seam, or crease. Corrugated also breathes: holding force depends on flow as well as vacuum level. The relation F = Δp × A (force = pressure difference × area) only holds if that difference survives a leaking surface. Chasing a deeper vacuum number on porous board wastes time; the seal and flow path matter more.
Step-by-Step Fix
Apply LOTO and keep hands clear of the pickup head. These are measurements, not bypasses.
1,Record the generator reading with the system running. Change nothing yet.
2,Measure at the cup twice: cup blocked (static baseline) and case picked (live). Compare both with commissioned values in your own machine's manual.
3,If both are low, check supply. Clean filter and muffler, check for line leaks, confirm air supply.
4,If the generator is healthy but the cup is low, check the seal. Replace worn lips; shift cups off seams and flute valleys. On warped board use a bellows or foam cup.
5,Re-test with the failing carton. If the reading holds but the case drops, evaluate flow and board condition rather than raising vacuum. Restore guarding and watch the first picks.
How to Prevent
- Blow dust off cup faces each shift; inspect lips weekly.
- Drain filters on schedule - a blocked muffler fails slowly but looks sudden.
- Keep a baseline per carton type and pick-test any new supplier or grade.
Fault 2 - Cases Slip or Drop During Transfer
"Dropped case" describes three different events. Watch one full cycle first.
Symptoms
- At pick: the case never settles into the grip before the robot moves.
- Mid-transfer: the case skews or slides out between pickup and placement.
- On acceleration: it holds at rest but fails during a fast move.
Root Cause
A pick-moment drop belongs to Fault 1 - the grip never fully formed. Mid-transfer slip points to worn pads, contact geometry that no longer suits the case, or a changed board surface. Acceleration-only drops are a margin problem: static grip is fine, but inertial load exceeds it when case weight changes, acceleration is raised, or a taught position drifts.
Step-by-Step Fix
Apply LOTO before inspecting the end effector; keep clear of the transfer path.
- Classify the drop - at pick, mid-transfer, or on acceleration.
- At pick, return to Fault 1 and confirm the pickup signal.
- Inspect pads and cup lips for wear or glazing; confirm flat, clean contact.
- Compare carton with recipe - dimensions and weight against commissioned values.
- Check motion settings and taught positions against your commissioned baseline. Restore raised overrides, verify positions, then ramp up in steps.
How to Prevent
- Include pads and cup lips in the weekly check, not just after a drop.
- Re-qualify grip whenever case size, grade, or fill weight changes.
- Log speed overrides; investigate position drift rather than re-teaching.
Fault 3 - Pallet Dispenser Jam / No Pallet at the Build Position
Never reach under a pallet stack or beneath a raised pallet. Use the HMI manual release and confirm the stack has settled.
Symptoms
- Bottom pallet will not separate; nothing reaches the build position.
- A pallet hangs partway out or tips.
- "No pallet" although the magazine is full - often every few pallets.
Root Cause
Warped or broken pallets catch on the separating forks. Debris in finger slots stops full travel. A dirty pallet-present photoeye means the controller never sees the release. Low air pressure shortens cylinder travel just short of home. Mixed pallet dimensions make one adjustment right for one pallet and wrong for the next.
Step-by-Step Fix
Apply LOTO; keep hands and tools outside the stack envelope. Use only HMI manual functions.
- Settle the stack with the approved manual function. Confirm stability.
- Inspect from the safe side for warped boards and broken stringers.
- Clear finger slots with a tool, not a hand.
- Clean the pallet-present photoeye and check its beam path and bracket.
- Check air pressure against your baseline, then cycle one pallet manually with the area clear. Restore auto mode and watch several cycles.
How to Prevent
- Inspect incoming pallets for warp, damage and size consistency.
- Keep the dispenser floor clear of slats and straps.
- Clean the photoeye weekly; check air pressure each shift.
Fault 4 - Infeed Conveyor Misalignment, Tracking and Case Jams
The infeed sets up every later step: skewed or bunched cases make picking impossible.
Symptoms
- Cases arrive tilted or off-center and the cup pattern misses.
- Cases bunch or leave an irregular gap at the infeed stop.
- The belt walks sideways or rubs the frame; jams cluster at the conveyor end.
Root Cause
A dirty or misaligned photoeye releases cases at the wrong moment. Bad spacing leaves too little room for the gripper or lets two cases reach the stop. Guide rails too tight pinch cases; too wide, they let cases rotate. A dirty, mis-tracked, or wrongly tensioned belt drags and skews boxes. VFD ramps that are too aggressive let cases slide and overshoot the stop.
Step-by-Step Fix
Apply LOTO before adjusting rails, sensors, or belt tracking; keep hands clear of pinch points.
- Clean and re-verify infeed photoeyes - lenses, mounting, sensing point.
- Check case spacing against the gripper footprint; irregular gaps point upstream.
- Set the guide rail gap to the carton - free to pass, tight enough to stop rotation.
- Inspect belt tracking and tension against your commissioned baseline.
- Review VFD ramps and upstream timing. If cases overshoot, soften ramps to the recorded baseline, match the upstream release rate, then trial a short batch at reduced speed.
How to Prevent
- Clean infeed sensors every shift; board fibre is a daily reality.
- Keep a guide-rail setting record for each carton SKU.
- Include belt tracking in the weekly check and log line-speed changes.
Fault 5 - PLC / HMI Alarms and Mid-Cycle Stops
An alarm that stops the machine mid-cycle is the PLC doing its job: it found a condition it cannot safely continue through.
Symptoms
- The HMI shows an alarm and the cycle stops partway through motion.
- Reset clears it, then the same stop returns; sometimes no obvious fault is shown.
- The stop follows a repeatable station, sensor, or point in the cycle.
Root Cause
Unstable power or a loose terminal causes intermittent I/O faults. A dirty sensor triggers a false condition at the same point each cycle. Communication interference between PLC, HMI and drives drops messages. Program or firmware issues belong last. Above all, record the full alarm code, text and machine state before pressing Reset - clearing it first destroys your best evidence.
Many "won't start" events are unmet safety conditions: a door not fully closed or an interrupted light curtain means run permission is withheld. Satisfy the condition; never defeat the device. Never bypass a light curtain or safety interlock to keep production running. For safety-system design and nuisance-stop diagnosis, see our guide to safety standards for robotic palletizing cells.
Step-by-Step Fix
Apply LOTO for any physical inspection of wiring, sensors, or panels. No step defeats a safety device.
- Transcribe the complete alarm - code, text, timestamp, axis position.
- Check the alarm history for a repeated code at the same cycle point.
- Inspect power and connections - supply, main circuit, loose terminals, I/O connectors.
- Verify the suspect sensor - clean it, check bracket and target, compare with your commissioned baseline.
- Check communications - PLC/HMI/drive cables and interference sources.
- Confirm program and firmware match the version at commissioning or in your latest backup.
- Satisfy safety conditions properly. Close guards and clear the light curtain by normal means; treat a persistent no-start as an electrical fault. Restore and monitor several cycles.
How to Prevent
- Make "record before reset" a written shift rule and review repeat codes weekly.
- Include terminal tightness and sensor mounting in electrical PM.
- Keep dated backups of the PLC program and recipes.
Fault 6 - Layer Pattern Errors and Unstable / Collapsing Loads
A pattern can look right for one layer and fail on the third - usually a process fault, not a motion fault.
Symptoms
- Alternating layers do not alternate, or repeat in the same orientation.
- The load leans, overhangs, or collapses during transfer to storage.
- The problem starts after a new carton size, supplier, or product.
Root Cause
Start with the recipe: the wrong one may be selected, or the upstream product-identification signal may be stuck on the previous SKU. Some patterns are not interlocked to recipes, so one can change without the other. Case dimension or strength variation changes how layers seat. An unsquared layer lets small offsets accumulate into a lean. A damaged pallet or excessive overhang removes base support; misplaced slip sheets add another source of error.
Step-by-Step Fix
Apply LOTO before entering the build area or handling cases and pallets.
- Confirm the active recipe matches the infeed carton and the product-identification signal.
- Check the pattern interlock so recipe and pattern cannot change independently.
- Measure the cartons against assumed dimensions and board strength.
- Inspect layer squaring and check the pallet for broken boards and overhang.
- Validate a complete stack with real production cases, including after transfer. Only then adjust coordinates against your commissioned baseline. This section diagnoses faults, not pattern design.
How to Prevent
- Use a recipe change checklist covering pattern and product identification.
- Require full-stack validation for every new carton size, grade, or supplier.
- Back up recipes and patterns.
Fault 7 - Low Air Pressure and EOAT That Won't Release the Case
This is the mirror image of Fault 1: the gripper picks successfully but will not let go. That points to the pneumatic release circuit, not pickup.
Symptoms
- The end effector carries the case past the placement point.
- Release is slow or partial, so cases land skewed or are dragged back.
- A double pick occurs because the previous case never left; a low-pressure alarm may appear.
Root Cause
Low pressure anywhere in the line starves the release actuator. A leak at a fitting, tube, or valve bleeds pressure away; a clogged filter or drifting regulator reduces what reaches the tool. Mechanical binding or a sticking solenoid valve prevents full stroke even at adequate pressure. Release timing may also no longer match the fitted end effector after tooling changes.
Step-by-Step Fix
Apply LOTO and depressurize the circuit before disconnecting fittings.
- Listen for a leak at the regulator, valve block and end effector.
- Confirm it with soapy water - bubbling identifies the leak. Tighten or replace the part; do not raise pressure to compensate.
- Check the filter and regulator against your commissioned baseline.
- Test the valve for a clean state change and verify full actuator stroke.
- Verify release timing against the same baseline. Restore air and guards, then run several placement cycles watching for complete release.
How to Prevent
- Drain filters daily and include a soapy-water leak check in weekly PM.
- Log regulator readings by shift so a slow droop shows early.
- Re-validate release timing whenever tooling changes.
Keep It From Coming Back - A Short Preventive Checklist
A summary for the wall, not a full maintenance programme:
- Blow dust and board fibre off cups and sensors every shift.
- Check air pressure against your commissioned baseline each shift.
- Inspect cup lips and gripper pads weekly for wear or glazing.
- Drain filters and mufflers on a fixed schedule.
- Check pneumatic lines for leaks with soapy water, not guesswork.
- Clean pallet-present and infeed photoeyes weekly; check brackets.
- Re-set guide rails and spacing whenever the carton SKU changes.
- Inspect incoming pallets and cartons for damage and size consistency.
- Review the alarm log for repeat codes instead of clearing and forgetting.
- Back up PLC programs, recipes and taught positions, with dates.
FAQ
Q: Why does my vacuum gripper fail after we change carton suppliers?
A: Porosity, moisture and print or tape placement affect how well a cup seals; a cup over a flute valley or tape seam leaks even with a healthy generator. Record your baseline at the cup, re-test at the same landing positions, and look at flow and cup geometry before increasing vacuum.
Q: My palletizer stops mid-cycle with an alarm - where do I start?
A: Transcribe the full alarm code, text and state before pressing Reset. Check the alarm history, then power, terminals, the suspect sensor, and communications; consider firmware last. If it is an unmet safety condition, satisfy it properly - never defeat the guard.
Q:
A: Why does the pallet dispenser jam every few pallets? Intermittent jams usually trace to warped or inconsistent pallets catching on the forks. Debris in finger slots, a dirty photoeye, or pressure low enough to shorten cylinder travel are the other causes. Inspect from outside the guard; never reach under the stack.
Q: Why do cases drop during transfer even though vacuum readings look normal?
A: Mid-transfer slips point to worn pads, contact geometry, or changed case weight. Drops only on acceleration point to insufficient grip margin from raised speed settings or a drifted taught position. Compare both against your commissioned baseline.
Q: Why is the stack leaning when all taught coordinates look correct?
A: Correct coordinates cannot compensate for a wrong recipe, a stuck product-identification signal, case variation, an unsquared layer, or a damaged pallet. Check those first, then validate a full stack of real cases before changing coordinates.
Q: Can I bypass the light curtain or safety interlock to keep production running?
A: No. Never short or defeat a light curtain or interlock: it stops the machine when a person could be in a hazardous area. Apply LOTO, satisfy conditions by normal means, and resume only with the circuit intact. A persistent no-start is an electrical fault, not a guard to disable.